Work completion — detailed check
On this shop-floor screen, you enter the start and end times and good and defect quantities for each process one by one to complete the work, or view and correct the records of work that is already finished. Saving applies the results to production results and material issue.
Screen layout
The top shows the steps Enter details → Work report → Done. The Process List is on the left, and the input fields for the selected process are on the right.
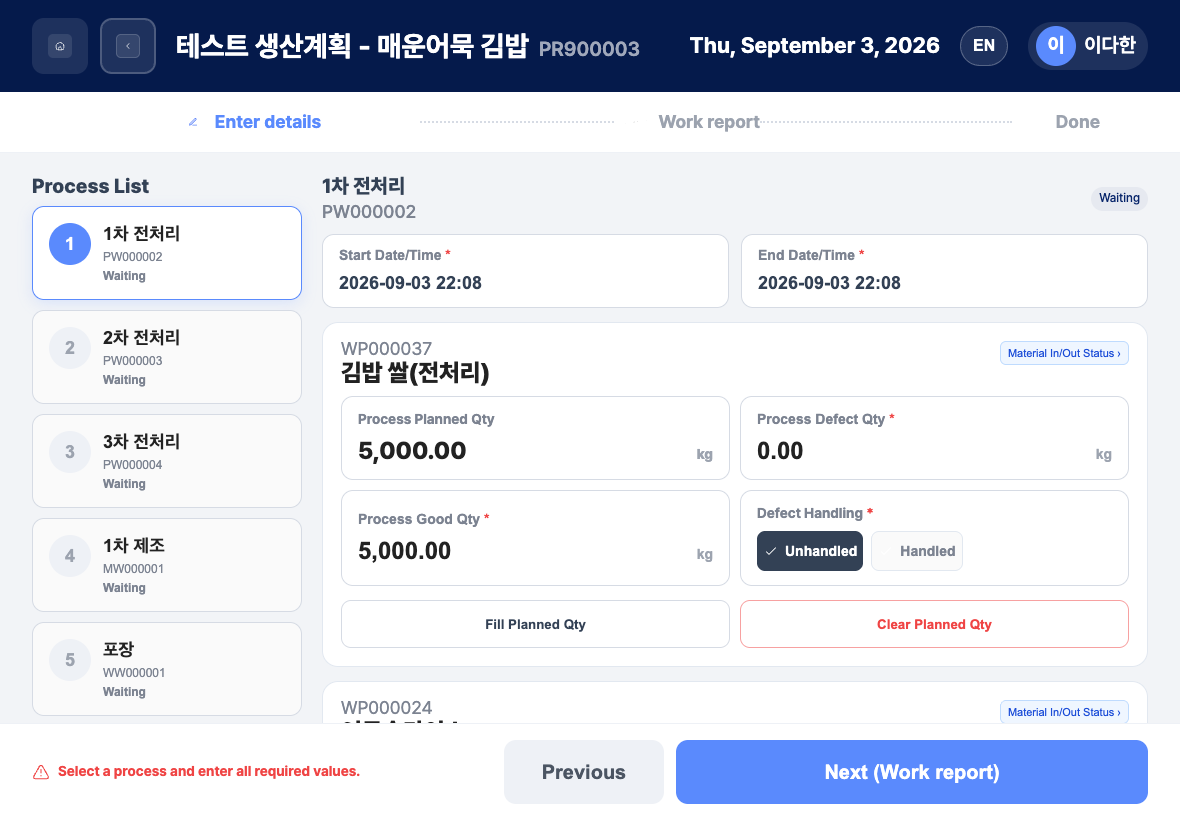
- Process List: Shows the processes of this work order in order. Tap one to open its input fields. Completed processes are marked with a check.
- Start Date/Time / End Date/Time: The times the process started and ended.
- Process Planned Qty, Process Defect Qty, Process Good Qty, and Defect Handling (Unhandled/Scrap)
- Fill Planned Qty / Clear Planned Qty: Fill in or clear the good quantity at once based on the planned quantity.
- Material In/Out Status: Check the required materials and issue storage for each output.
- Good Rate, Defect Rate, Achievement vs Plan, and the Complete Process button
- Buttons at the bottom: Previous, Next (Work report)
Complete work with Detailed Completion
- In the simple window, tap Detailed Process.
- In the Process List on the left, tap a process.
- Tap Start Date/Time, choose the date and time, and tap Select end date/time →. Then choose the end date and time and tap Done. To use the current time, check Use current time.
- For each output, enter the Process Good Qty and Process Defect Qty, and choose Unhandled or Scrap in Defect Handling.
- Tap Material In/Out Status to check the required materials and issue storage.
- To complete just this process first, tap Complete Process. If processes remain, the
The process has been completed.window appears, and tapping Next process moves you to the next process's input. If it was the last process, theWork completion has been processed.window appears. - To complete everything at once, tap Next (Work report), and if needed, add text, photos, and files to the work report. You can also fill in the work report by speaking with Voice Input.
- Tap Complete All. Tap Confirm in the
Work completion has been processed.window, or you return to the list after 7 seconds.
View and edit details of completed work
- In the Work completion list, tap Details on a finished card.
- Check the Planned qty, Good qty, Defect qty, Production info, and Outputs.
- Tap a process in Work history by process to expand it and see the start and end date/time, quantities by output, and Material Outbound Status.
- To correct a process record, tap Edit for that process. In the
Edit process historywindow, correct the times, defect quantity, good quantity, and defect handling, then tap Save. - To correct the work report, tap Edit in Work Report. In the
Edit work reportwindow, correct the text, photos, and files, or use Voice Input, then tap Save. - When you are done, tap Back to List.
FAQ
Q. A message says the end date/time must be later than the start date/time. Choose the end date/time again so that it is the same as or later than the start date/time.
Q. It says Quantity exceeds the planned quantity.
Change the good quantity to the planned quantity or less. On the keypad, Confirm cannot be tapped if you exceed the planned quantity.
Q. The work will not complete.
A work order needs a barcode for the work to start. If Barcode information required to start work was not found. appears, ask someone to check the production plan and barcode registration on the office PC admin screen.
Q. Do I need to issue materials separately? No. When you complete the work, the required materials that have not been issued yet are issued together. If this fails, check the error message on the screen and try again.
Related menus
- Work completion list — Find the work orders to complete.
- Work completion — simple check — Check only the good quantity and complete the work quickly.
- Work Completion — Work completion on the office PC admin screen.